The $12 Sportster Luggage Rack
by
Jay Munro
Bargains have a way of not being so great sometimes. I bought a closeout T-Bag's sissy bar back pack for $25 and put it on my 2000 Sporty. With my short sissy bar, unfortunately, it rested on my rear fender, messing up the finish. While the HOG sticker hid some of the damage, the solution to scraping more paint off was to put on a luggage rack. However, when I saw the prices ($60 and up) I decided to make my own.
The rack attaches to the sissy bar with the existing bolts. Sorry, this works only if you have exposed external screws, and not the hidden ones. When you mark your holes for mounting, you need to determine if you want the rack parallel with the ground, or at a slight angle. On my bike, I made it angle down a small amount to match the angle of the sissybar, so when carrying boxes I could have it snugged up to the sissy bar more, rather than leaving a lot of air. It works well, but I may try another one with it a little more parallel with the ground to see what happens.
Please note, the following steps are written out in the order I did them, but you can skip around a little (like cut off the tabs first, then drill.)
Materials ($12 if you have a few things in your junk box, $20 if not)
Tools
Here's the original problem, my T-Bag rested on the fender.

Depending on how much stuff is in it, this was really messing up the fender.
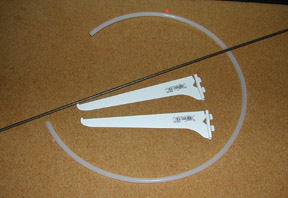
About the parts:
The shelf brackets come in a number of styles.
Home Depot sells real crap, they are too thin and the is not wide enough to
drill for the two mounting holes. You can find thicker steel ones ones at a
good hardware store. The threaded rod comes in stainless or plated steel. Stainless
is a little more money, but you won't have to worry about it rusting. You can
also use plain rods, and thread the ends yourself. I put plastic tubing over
the threads to protect the bag and other items, but you probalby wouldn't need
that with smooth rods. The nuts and washers are plated steel, again, stainless
is better but costs more. I originally had plain 1/4-20 hex nuts on the outside,
but then changed to acorn nuts for a smoother look.
Making it!
Step 1. Remove the stabilization pieces from the shelf brackets. These are the little lateral pieces that hold the bracket from wobbling when used on a shelf. Grab the top part (opposite the spot welded part) and just pry them off. they should bend a little, then break the weld.

After
removing the stabilization pieces, mark the mounting holes.
You can get these marks by putting a little crayon or ink on the heads of the screws on the base of your sissy bar. Then hold one bracket against it at the position you want it to be and tapping it lightly. Take it off and fill in the marks. Once you have the positions, tap them with a prick punch, or 20p nail to mark where you're going to drill. Take the second bracket and tape it to the first one. Make sure they are alligned and taped securely so when you drill through the two, you don't slide one and drill in the wrong spot.
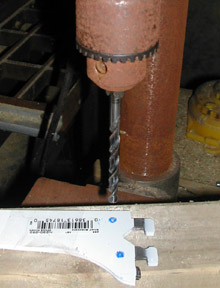
Step 2. Drill the mounting holes with a drill press
or hand drill. With the two brackets taped together, you need to go slow so
they don't slip. Use a small drill first or a very sharp 1/4 drill to get a
clean cut. Take your time! Once you have drilled the holes, check the fit against
your sissybar. If the screws are tight, or the bracket doesn't fit at the correct
angle, drill or ream one hole a little bit. Don't go too much, then recheck.
If you make the holes too big, it will be difficult to get the bracket to be
square.
 .
.
Drill
the mounting holes with the brackets taped together to get correct alignment.
Step 3.Cut off the tabs on the brackets. You can do this first, I just did it after I was sure the holes were correct (if I screwed up, it was less work to get new brackets).
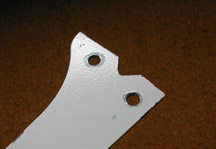
Cut
off the tabs, and file down the edges.
Step 4. Next measure and drill the holes for the cross bars. When you measure for holes, you can space them evenly, or not. Just besure to leave enough room for the one closest to the seat to clear the sissybar bracket. Mine were approx 2 1/4" apart. Use a straightedge when marking the actual holes. If you use 1/4" rod, you can make the center of the holes approximately 3/8" below the top of the bracket. Tap start marks with a nail or punch on each pen mark so your drill won't wander.
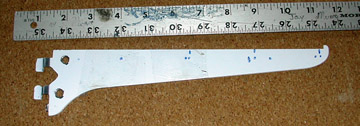
Measure
for the cross bar holes. Here you see a few trial and error marks (pays not
to use a sharpie...)
Step 5. Once all holes have been drilled, cut your cross bars. I used 4 bars, you can use more or less depending on your needs. On my bike, the width of the sissy bar was 8.25", with the external width about 8.5" from side to side, as it was a Softtail style and not an original Sportster. To leave enough room for the external acorn nuts, I added 3/8" to each side for a total length of 9.25". On problem I encountered was that at 9.25", I could only get 3 full size pieces, and one slightly short piece from the 36" rod. You can see on the later pictures that I added a short piece (cut off a 1/4-20 x 1" bolt) and used a wide nut to make up the difference.
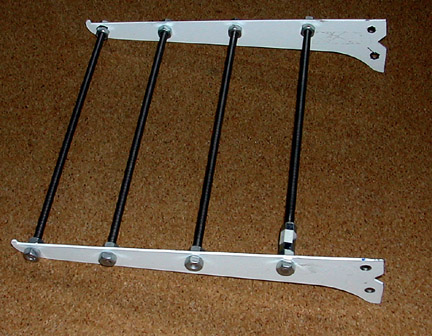
Assemble your rack to see how things fit. You'll notice the "extender" on the rear rod. Here I used plain 1/4-20 nuts on the outside.
Before you finish the rack, try it on the bike for size to be sure everything is how you like it.
Step 6. When you're satisified with the fit of everything, take it apart and finish the side pieces. I counter sunk all the holes slightly with a 1/2" drill so it would take any burrs off. I also used steel wool and roughed up the white paint to prep it. I sprayed the side pieces black (you can use color or chrome, whatever you've got around). I used black Krylon, with several coats, then two coats of Krylon clear over that. It still chipped, but I tried...
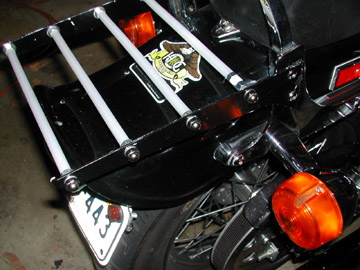
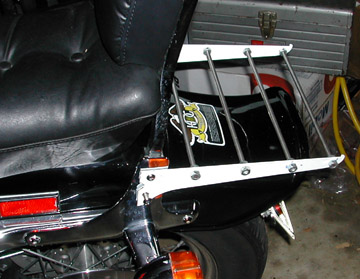
Here's the finished rack. ready to ride.
When the paint dries, reassemble the rack on the bike, it's easier to get it aligned correctly. When you tighten the jam nuts on the inside keep an eye on the bracket so it doesn't pinch in some areas and bulge in others. If you use plastic or rubber tubing, cut them slightly shorter than the inside width, to give yourself some working space. On mine, I put a 1/4-20 jam nut and flat washer on the inside, and a split washer and acorn nut on the outside. If you want to make sure it all stays together despite the usually Sporty vibration, put a little locktite (or steal the SO's worst nailpolish and use that, same difference).
That's it, Ride safely!
check out Crazy Steve's Sportster Lift Adapter